How to get consistent color output and avoid the dreaded PS color shifts
Color shifts in web design graphic outputs are probably a much worse problem that one might imagine. I’ve recently tackled this issue at work and wanted to share my findings.
My set up at work is as follows:
- MAC Book Pro running Lion
- Dual Screen monitors using the laptop screen and an awesome Dell U2410 monitor.
- Adobe CS5
This all started when my work machine was upgraded to Lion OS. After this, all of my settings within CS5 and my color calibrations thru my monitor were out of whack.
I was noticing odd things like the color of images pulled from the web looked different in Photoshop. A LOT DIFFERENT. Well here is how I fixed it and I would recommend everyone doing this same thing (especially those I work with) so that we are all producing graphic files that have the same color profile information.
First, make sure your monitor (if not using the MAC laptop screen) is set to sRGB. To do this:
FOR MACS
1.Go to the Apple > System Preferences > Display (to make sure you’re on the correct screen if using dual screens) > Color (make sure you’re editing the secondary/main screen)
2. In the color settings of the monitor in question scroll to the bottom and select “sRGB IEC61966-2.1”. sRGB is the industry standard color calibration for the web.
Next you need to go into CS5 programs and set up your color settings:
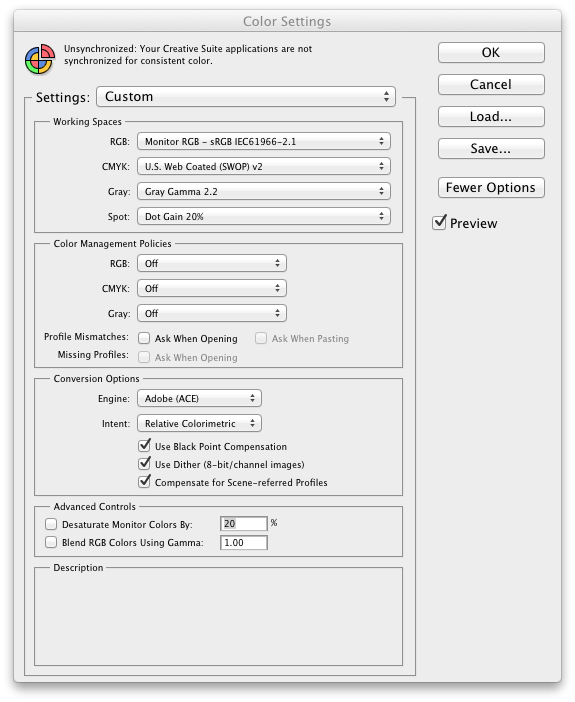
1. Open Photoshop (these instructions work for illustrator also) and without a file open go to EDIT > Color Settings…
2. in the Color Setting dialogue box, change the WORKING SPACE RGB to Monitor RGB. This will force photoshop to match the color on your monitor (which is now sRGB).
3. in the Color Settings dialogue box make sure the “ask when opening” box is UNchecked. See the graphic below.

4. Close Color Settings
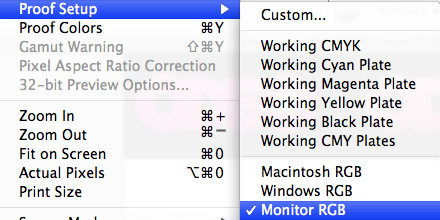
5. Now in Photoshop, Under “VIEW” make sure your PROOF SETUP is > Monitor RGB

6. Go back into “VIEW” and make sure “PROOF COLORS” is UNchecked.
Last but not least. SAVING the images out for the web.
One more thing to make sure you DON’T do. When saving a file with ‘Save for Web’ make sure you uncheck the CONVERT TO sRGB box. Mainly because if done correctly your file should already be using that profile.
If you follow the simple steps above we should ALL be producing the same colors in everything we do.
Reply
You must be logged in to post a comment.